Facebook, as one of the most popular social networking platforms, prioritizes user privacy and security. The “Restrict” feature is among the tools Facebook offers to help users manage their online interactions. Restricting someone on Facebook creates a selective boundary, permitting communication without exposing personal information and content. This feature helps maintain privacy while staying connected with friends, family, or acquaintances.
Over time, situations and dynamics change, and you may need to reverse this restriction. Whether you’ve resolved a conflict, rekindled a relationship, or wish to allow more open communication, unrestricting someone on Facebook becomes necessary.
This article will guide you through the steps with clear instructions to help you navigate the unrestricting process smoothly. Knowing how to use the “Restrict” and “Unrestrict” features allows you to tailor your Facebook interactions to your needs while maintaining control over your online presence.
Methods for Unrestricting Someone on Facebook
Now that you’re informed, let’s explore the various methods you can use to unrestrict someone on Facebook. We’ll cover different approaches for both the website and the app.
Unrestricting on the Website
If you use Facebook on your computer or laptop, follow these steps to unrestrict someone:
- Go to Facebook.com and log in to your account if you haven’t already.
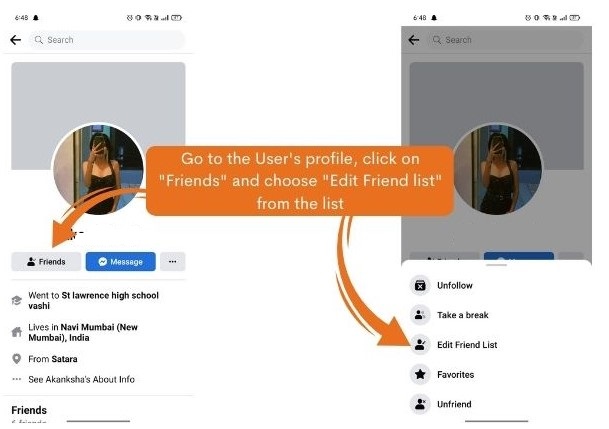
- Navigate to the profile of the friend you want to unrestrict and click on the “Friends” option.
- A drop-down menu will appear, where you can choose “Edit Friend List.”
- Find the “Restricted” option and uncheck the box to unrestrict your friend.
Unrestricting Someone on Facebook App
If you use the Facebook app, follow these steps to unrestrict someone:
- Open the Facebook app and log into your account.
- Go to the profile of the person you want to unrestrict.
- Select “Friends” and then choose “Edit Friend List.”
- Remove the checkmark from the “Restricted” option to unrestrict them.
Manage Your Restricted Friend List All at Once
This method allows you to review and manage all the individuals you’ve restricted on Facebook:
- Go to your Feed and find the “Friends” option in the left vertical menu.
- Click on the “Friends” section in your Feed.
- On the next page, select the “Custom lists” option.
- Click on “Restricted” to see the list of people you’ve restricted. To unrestrict someone, click the small cross icon next to their profile picture.
Unrestricting Your Own Facebook Account
Your own Facebook account can sometimes face restrictions imposed by Facebook due to actions like spamming, posting inappropriate content, or copyright infringement. Here’s how to handle these issues:
- For minor violations such as spamming, wait for the restriction period to expire without further violations.
- For more serious violations or permanent suspensions, contact Facebook’s Help Center and request a review.
| Violation Type | Restriction Duration | Recommended Action |
|---|---|---|
| Minor (e.g., Spamming) | Few hours to a day | Wait for restriction to expire |
| Major (e.g., Hate Speech) | Several days to weeks | Request a review from Facebook |
Understanding Restricted Users’ View and Posting with a Restricted List on Facebook
Restricted users on Facebook can still see certain types of posts:
- Public Posts: Identified by the globe icon, these posts are visible to everyone, including restricted users.
- Friends Posts: Posts with the icon resembling two people are visible to restricted users if they are tagged or mentioned in the content.
Posting on Facebook with a Restricted List
Once you’ve added friends to your Restricted list, create a new Facebook post as usual. Before posting, make sure the Friends (people) icon is displayed. If the Public (globe) icon is shown, tap on it and select Friends. This ensures that restricted users will not see posts intended only for friends.
Unrestricting Someone on Messenger
If you want to unrestrict someone on Messenger, follow these steps:
- Open your Messenger app and tap on the Hamburger menu to access your account settings.
- Tap on the Settings Icon and navigate to the ‘Privacy & Safety’ section.
- Find the ‘Restricted accounts’ section within the Privacy menu. Locate the person’s name and tap on it to open the chat window.
- In the chat window, tap the ‘Unrestrict’ button at the bottom of the screen to confirm the action.
Your Feedback Matters
This article has equipped you with the knowledge and steps to unrestrict someone on Facebook, manage your restricted friends list, and unrestrict users on Messenger. Understanding Facebook’s “Restrict” feature is essential for managing your online interactions while maintaining privacy.
By following our guide, you can make informed decisions about your Facebook interactions and ensure a more positive and secure online experience. We appreciate your feedback and would love to hear your thoughts. Did you find the information helpful? Please share your feedback or any additional questions in the comments section below. Your insights will help us continue to provide valuable content for our readers.